
| Tools needed : Makeup Brushes, wedges, tweezers, q-tips, Your own makeup ( mascara, eyeliner, eye shadow, blush, 2 shades foundation, Medium color or transparent loose setting powder, lip pencil, lipstick or lip gloss ). |
 Lip sticks and pencils : Any kind or color is fine. The wetter the look, the easier it will come off. For most of us, stay away from super bright red colors, unless your wearing red. Red draws attention to your mouth area, and with our male chin and jaw size, it will get you read easier. Plums and berry based colors are more subtle. If you have feminine lips and facial features, then by all means go red. Some advise to wear a dark pencil color under your lipstick or outline with a darker color. Not true. It looks stupid, so don’t bother. Lip sticks and pencils : Any kind or color is fine. The wetter the look, the easier it will come off. For most of us, stay away from super bright red colors, unless your wearing red. Red draws attention to your mouth area, and with our male chin and jaw size, it will get you read easier. Plums and berry based colors are more subtle. If you have feminine lips and facial features, then by all means go red. Some advise to wear a dark pencil color under your lipstick or outline with a darker color. Not true. It looks stupid, so don’t bother.
|
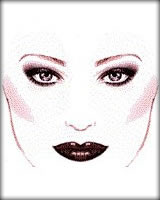
| Warning : You must be aware of what make-up can do. Make-up is harmony between shadow and light, that fashion the different areas of your face. Shadow hides an area while light gives it prominence. You want to highlight you best features. Makeup can not create something that is not there. |
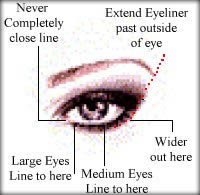 This should work for anyone, but the bottom of the eye is different. The basic rule is this. Large eyes can go end to end, but never connect the lines on the inside of your eyes. Medium size eyes three-quarters to half the outside of the eye. Small eyes the outside quarter or no line at all. If you have small eyes, going end to end will make them look smaller. The idea of eye makeup is to ”bring out” the eyes. They are usually the focal point of the female face. Any length you decide on should be wider as it moves toward the outside eye area. Just as we did for the eyelid. You should take a Q-tip and smudge these lines also. I sometimes use dark shadow to line the bottom lash area. Remember, blending is key! While you have you liner out, check your eyebrows. They probably look a little pale from all the foundation and powder. Go ahead and fill in some color with your eyeliner. NOT WITH BLACK, unless you have black hair. Eye brows should be a little darker than our hair, but stay away from black eye brows. Make small angled lines across the brow, not one solid line. Almost done with the eyes. If you do not have an eyelash curler, get one. They work wonders on opening the eye! The last step is adding mascara. I only do my upper eye lashes, not the bottoms below the eyes. Apply the first coat on top on the lash. Apply two coats under the lash. You want to apply the mascara with a back and forth wiggle motion as you pull it out over your lashes. Not just out and up. It will help get better coverage between the lashes. A couple of tips here. First, gently wipe or roll the mascara wand on a sheet of paper towel or Kleenex. This will remove clumps or excess mascara before you apply it. This is especially true to the tip of the wand. Second, if you get some on your eyelid or cheek, donYou will only smear it worse. ’t try to wipe it off! Take a Qlittle foundation over the spot. Use the other end of the -tip and dab on a Qmistake best. -tip to dab on some setting powder. This should work for anyone, but the bottom of the eye is different. The basic rule is this. Large eyes can go end to end, but never connect the lines on the inside of your eyes. Medium size eyes three-quarters to half the outside of the eye. Small eyes the outside quarter or no line at all. If you have small eyes, going end to end will make them look smaller. The idea of eye makeup is to ”bring out” the eyes. They are usually the focal point of the female face. Any length you decide on should be wider as it moves toward the outside eye area. Just as we did for the eyelid. You should take a Q-tip and smudge these lines also. I sometimes use dark shadow to line the bottom lash area. Remember, blending is key! While you have you liner out, check your eyebrows. They probably look a little pale from all the foundation and powder. Go ahead and fill in some color with your eyeliner. NOT WITH BLACK, unless you have black hair. Eye brows should be a little darker than our hair, but stay away from black eye brows. Make small angled lines across the brow, not one solid line. Almost done with the eyes. If you do not have an eyelash curler, get one. They work wonders on opening the eye! The last step is adding mascara. I only do my upper eye lashes, not the bottoms below the eyes. Apply the first coat on top on the lash. Apply two coats under the lash. You want to apply the mascara with a back and forth wiggle motion as you pull it out over your lashes. Not just out and up. It will help get better coverage between the lashes. A couple of tips here. First, gently wipe or roll the mascara wand on a sheet of paper towel or Kleenex. This will remove clumps or excess mascara before you apply it. This is especially true to the tip of the wand. Second, if you get some on your eyelid or cheek, donYou will only smear it worse. ’t try to wipe it off! Take a Qlittle foundation over the spot. Use the other end of the -tip and dab on a Qmistake best. -tip to dab on some setting powder.
|
|
|
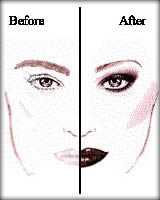
Well, that about it. I hope this work as well for you as it does for me. Seems like a lot of work. Well, beauty has its price. If I’m pressed for time, I can do this in about 35 to 40 minutes. I don’t like to do that though, because I enjoy getting ready as much as going out. Also, if you only have one tone of foundation, you can create the same effect with contour powders. Does it seem like a lot of make up? Yes it is. But what about the ”less is more” makeup motto. One words… BULL !
|
|
Those models on Cosmo, with their natural look are plastered in makeup. Sounds like a oxymoron, but it takes a ton of work and makeup to look natural *laugh* Besides, this isn’t for shopping at the mall on Saturday. This is for looking and feeling feminine at a nightclub! You could use the same method, just use a little less and a more neutral color palette. The results would be about the same. The ”less is more” is a look, not always the way it is applied. Heck, I never said I was an expert. I’m far from that. It does take a little practice and experimentation. But that half the fun ! If you do ever get the chance to have a professional makeover… DO IT ! I learned more from the one time I had one, than I have reading 100 magazine articles. I would like to do it again one of these days. I was having so much fun, I probably missed some important tips. If possible, Tape your session for review later. Ask as many questions as you can. Makeovers can be expensive and you might as well learn as much as you can. I only posted this section, cause so many people have asked me to do so. I have e-mailed a smaller version to about 10 or 15 people. They loved the results. If you try it, let me know the results. If you have a better idea or a makeup tip of your own, let me know. I’d be ecstatic to try it myself or post it here. The neatest thing I can say about the Transgendered community; we are always willing to share ideas and knowledge. |
All pictures and content copyright © of an american Tgirl
 Makeup brushes
 Loose setting powder
 Foundations
 Mascara
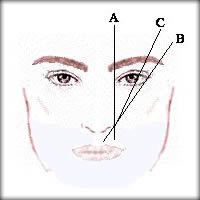 Eye
Eye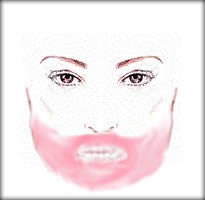 Beard
Beard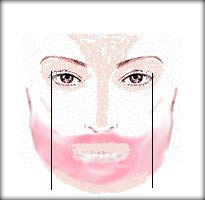 Foundation
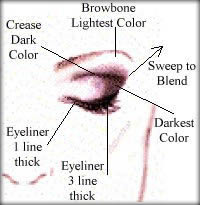 Eyes
Eyes Blush
Blush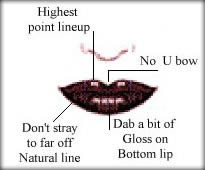 Lips
Lips