
|
Prologue : OK, so you want to have a real looking female chest. Having cleavage will probably help you pass more than anything else. You can be tall, heavy, maybe not have feminine facial features, or have a really bad hair day , but toss in a great looking rack and you’ll pass 80% of the time. It is really not that hard to do, but like makeup, it takes some practice. I’ve done this about a fifty times and I still have results that come out better or worse than other times. So, lets get to work !
|
|
Step One : Lose the hairy chest ! Yep, your S.O. will hate this one. My wife gives me the cold shoulder treatment every Fall season when I get rid of my body hair. This is not like leg hair, where sometimes you can just bleach it and cover them with stockings to hide it. You have to get rid of the hair, period! What method you choose is up to you. Shaving, depilatory, or waxing all get you the same results. I use the latter or I should say, I use an Silk-Epil from Braun… one of those electric hair pullers. They allow me to go without shaving for up to 3 weeks. The down side is this… THEY HURT LIKE HELL ! If you have never used one, I’ll explain how much they hurt. Place you hand on a cement block. Now get a hammer a smash your thumb. Now wait about five minutes… Ok, smash your thumb again… Its that second one that really hurts! That is the type of feeling you get with these devices. *laugh* Yes, that might be an exaggeration, but not by much. They are really not that bad on the legs, but on the stomach and chest get ready for some major stings. Especially, right down the middle where you nerve ending overlap. OUCH ! Just wanted to warn you.
|
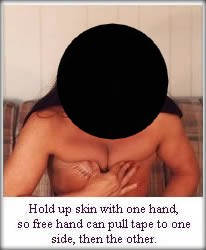 Now,
bend over at the waist and with both hands, press your chest skin up and
toward the center your neck. I know….. you can get it up that far,
but that is the direction you want to push it up. Besides, if you could
move you chest up to your neck, you wouldn’t need to be doing all
of this work to create cleavage! *smile* You should be able to use you index
finger and thumb on one hand to hold it all in one place. If you have a
friend or an understanding S.O. have them help. Grab one of the loose ends
of tape and pull it to the opposite side of you chest. Pull it across firm
to tight. Pulling to hard will pull off the tape completely or break it.
Besides, you not playing "tug of war" with your skin. Attach straight
across or at a slight down angle is fine. This is a little harder to do
by yourself than it sounds. Its hard not to interfere with the other piece
of tape dangling there as you pull the first one across your chest. Now,
bend over at the waist and with both hands, press your chest skin up and
toward the center your neck. I know….. you can get it up that far,
but that is the direction you want to push it up. Besides, if you could
move you chest up to your neck, you wouldn’t need to be doing all
of this work to create cleavage! *smile* You should be able to use you index
finger and thumb on one hand to hold it all in one place. If you have a
friend or an understanding S.O. have them help. Grab one of the loose ends
of tape and pull it to the opposite side of you chest. Pull it across firm
to tight. Pulling to hard will pull off the tape completely or break it.
Besides, you not playing "tug of war" with your skin. Attach straight
across or at a slight down angle is fine. This is a little harder to do
by yourself than it sounds. Its hard not to interfere with the other piece
of tape dangling there as you pull the first one across your chest. 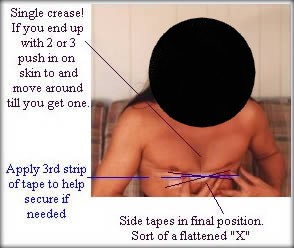 I
usually loop back the loose end of the piece I’m not working with,
up on my wrist holding my skin or shoulder. I should have taken a picture
of that. Sorry about that, but I think you’ll find out what I mean
when you try it. Well, after you get the first piece across and in place,
rub you fingers on it to ensure a good adhesion. Repeat the same procedure
for the other side. If you think you might be going somewhere warm, you
might want to use a third piece over the top for extra security. You should
end up with one nice wrinkle in your chest for the cleavage. If you end
up with two or three little one, just push on your skin above and below
the tape in the middle of your chest to reposition it for one wrinkle. Some
people say to just pull as hard as you can on the tape to get cleavage instead
of holding the skin up first. You can do that, but you will risk damaging
your skin! I know this sounds dumb, but the is a difference between taping
skin in place that has been repositioned, and pulling skin in place. The
first is moving a whole area in place, then securing it there. The latter
will pull on your top layer of skin, which could result in blisters. Also,
try to make sure there are few or no wrinkles in the tape. That can also
cause a problem. I hope these last two warning makes sense to you. If it
doesn’t, it will 6 hours later after you did this the wrong way. Just
ask my friend Jo. She had a red skin irritation along with a few blisters
for a month ! I
usually loop back the loose end of the piece I’m not working with,
up on my wrist holding my skin or shoulder. I should have taken a picture
of that. Sorry about that, but I think you’ll find out what I mean
when you try it. Well, after you get the first piece across and in place,
rub you fingers on it to ensure a good adhesion. Repeat the same procedure
for the other side. If you think you might be going somewhere warm, you
might want to use a third piece over the top for extra security. You should
end up with one nice wrinkle in your chest for the cleavage. If you end
up with two or three little one, just push on your skin above and below
the tape in the middle of your chest to reposition it for one wrinkle. Some
people say to just pull as hard as you can on the tape to get cleavage instead
of holding the skin up first. You can do that, but you will risk damaging
your skin! I know this sounds dumb, but the is a difference between taping
skin in place that has been repositioned, and pulling skin in place. The
first is moving a whole area in place, then securing it there. The latter
will pull on your top layer of skin, which could result in blisters. Also,
try to make sure there are few or no wrinkles in the tape. That can also
cause a problem. I hope these last two warning makes sense to you. If it
doesn’t, it will 6 hours later after you did this the wrong way. Just
ask my friend Jo. She had a red skin irritation along with a few blisters
for a month ! |
|
Well, that is about it, in a nut shell..our should I say bra cup *smile* Have fun experimenting with your cleavage. I hope this section helps you evolve more toward your feminine illusion. I will be adding a few more things to this section in the near future. Like a good way to use duct tape without damaging your skin in the process. An added note: when you are ready to remove any type of tape. DO NOT YANK it off. Some of the top layer of skin might come with it! Pull it of slowly and hold your skin in place as you remove it. If you are wearing tape during warm weather, your perspiration will aid in coming off later. In mild weather, your body heat over a few hour , will make the adhesion better. So, be careful when you remove it! If you use a really good tape, you might need to take a hot shower to help remove it. Better than damaging your skin! As in my makeup section, I claim to be no expert at any of this. I am just passing on what I have learned from talking to others or by experimentation. If you have any additional information or comments, please feel free to write me. HAVE FUN AND TAKE CARE !
|
  
|
All pictures and content copyright © of an american Tgirl
 Step
Two
Step
Two Step
Three
Step
Three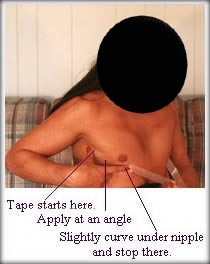 Step
Four
Step
Four Step
Five
Step
Five